Links and Buttons
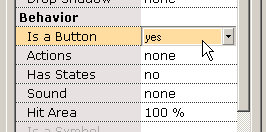 To make a shape or text into a button, select "yes" for "Is a Button" in the Properties popup. A button can serve as a link to another web page but it can be much more than that. You can design the button's appearance to change for different mouse events, and you can program actions like go to another web page on release of the button (called GetURL action).
A button can dynamically assume in the Flash player or on a web page different appearances, reflecting whether the mouse is away from the button, over the button (e.g., mouse-over effects), or has pressed the button. To achieve such effects, you select "yes" for the "Has States" property. Upon selecting yes, the property dialog changes. Three buttons, Up/Over/Down, are added to the top. You create and edit the three button states from the Up/Over/Down buttons at the top of the properties popup. Each state can have its own sound, shape color, etc. A point of confusion, it that the actions for the button -- what the button does like cause the web page to change -- are added to only the Up state property page (the state of the button when the mouse is not over it or being pressed). Because the interface is WYSIWYG (what you see is what you get), the button appears in the final animation for each frame the button appears in the editing environment. In other words, if the button is missing in a frame, it will be missing in the final animation in that frame.
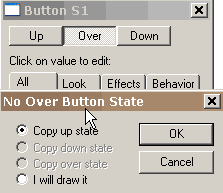 If you press the Over button (corresponding to mouse events roll over, roll out, drag over, and drag out) for the first time, a popup will appear asking you if you want to create the over state from a previously drawn state or if you want to draw it from scratch. If you are only changing the color of the state, you would select copy the up state and edit the color from the value corresponding to the up state to the value you want to correspond to the over state.
 When the Over button is pressed, you can change properties of the over state and edit the shape corresponding to the over state. A faint image of the shape corresponding to the up state is displayed under the shape for the over state for alignment assistance. If you want a sound to play when the mouse moves over the button, add the sound to the Over state property page near the bottom. If you want a sound to play when the mouse is pressed or released over the button, add the sound to the Down state property page.
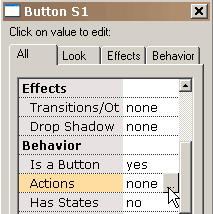 By pressing on the actions property button in the up state of the button, you can assign and edit the actions for the button which may be triggered by different mouse events.
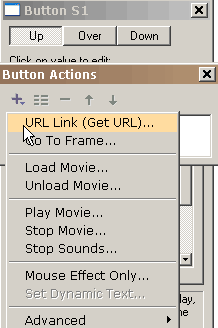 The + button presents you with the possible button actions (we will be adding more soon), most of them self-explanatory. Each of these actions can respond to one or more mouse events.
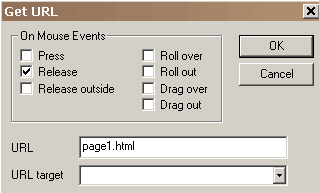 Selecting Get URL, presents us with this popup. We can select which mouse events active Get URL action. The URL for the action is filled in. The over state of a button is activated for roll over, roll out, drag over, and drag out mouse events. The down state of a button is activated for press, release, and release outside mouse events.
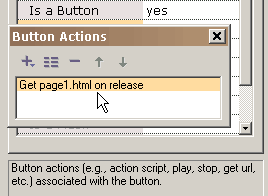 On pressing OK, the action is added to the list of actions associated with this button. Any action can be edited or viewed in more detail by double-clicking on it or by selecting it and then selecting the properties button (second from the left at the top of the popup).

If we want a roll-over effect when the mouse passes over the square in addition to going to the URL on mouse release, we add a second action, Mouse Effect, to our list of actions and select Roll Over as a triggering mouse event. Mouse Effect action is unique in that is only controls the appearance of the button with no resulting action taken.
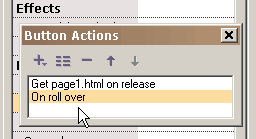 On pressing OK, we see both actions associated with this button.
This is a brief explanation of the other button actions:
a) Go to Frame specifies a frame to jump to (if previous or next frame is selected, it could be a tween frame if that is the adjoining frame)
b) Play plays the movie
c) Stop stops the movie
d) Stop Sounds stops all sounds
e) Load Movie loads a movie (explained more below)
f) Unload Movie unloads a movie
g) Print and Print as Bitmap actions provide the cability to print key frames
h) Set Dynamic Text sets the text content of a dynamic text object
i) Load Dynamic Text loads text into a dynamic text object from a .txt file (the file starts with the name of the text object followed by equal sign followed by the text without quotes)
j) Send Form Data retrieves text from dynamic text objects and sends it to an url
k) FS Commands provides a general method for Flash to send a message to whatever program is hosting the Flash player
l) Javascript
m) Tell Target actions provide communication to other movies
For use on the web, the URL for the loaded movie can be an absolute or relative URL, but, for testing purposes, all the movies must be in the same directory without directory or disk drive specifications in their names. Also, there should be no spaces in the name as this will cause problems in Netscape web browser. Http:// should not be in the URL for a loaded movie because it will also cause problems with Netscape web browser. When testing a movie using Play in Browser, any HTML and SWF files, referenced by Get URL or Load Movie actions, MUST be in the same directory as the fun file for these button actions to access these files or set the directory for playing the movie in Preferences. Load movie loads a movie without closing the current movie. All of the higher levels have transparent backgrounds which allows to see the layers underneath. Unless you include in the loaded movie a shape under all other shapes that equals or exceeds the size of the movie frame and that is filled with an opaque color or a bitmap, you will see the first movie underneath the loaded movie. The movie background color, size, and speed are set by the movie at level 0. None of the button actions function in the KoolMoves internal player.
In order to daisey chain movies together, you use Load Movie. Create a base movie that loads in the other media and then loops - make sure that you do not loop in the load movie action. Load your main movie into Level 2 and your background into Level 1. Run your movie to the end then use a Load Movie command into Level 2. This will load the new movie into that level. Then create aditional frames and loop back.
The actions for a button cannot vary from frame to frame. If you want a button's actions to change from one frame to the next, copy and paste the button in the same frame that contains an instance of the button and then cut and paste this button to the frame where you want the actions to be different. This procedure creates a button that looks the same as the original but allows you to have different actions. Hopefully, in the future there will be a better solution for this situation.
Symbols
One of the principal methods for creating small Flash™ animations is by making as many shapes into symbols as possible. A symbol is a shape that is shared by other shapes (called instances of the symbol). If you move a point in one instance it will be moved in all instances throughout the movie (KoolMoves first asks you if you want to change all instances). If you change the gradient in one instance, all instances will be changed. And, so on. The exceptions to this are the interior color of the shape, shape position, scale and rotate transformations. These four only change the instance acted upon, not all instances. This is dictated by the Flash file format.
For simplicity, KoolMoves treats all text shapes as symbols.
If you have shapes that appear more than once in a single frame or in multiple frames, then it is advisable to make these shapes into symbols if you do not intend to move individual points from one frame to the next. In many cartooning situations, you would want to move points from one frame to the next to make a mouth move to simulate talking or to made a hand move to simulate waving, etc. so such shapes would not be good candidates for symbols. If the shape is stationary and undergoes no change throughout the movie, it is not necessary to make the shape into a symbol (KoolMoves will automatically handle this situation). In the future, we will be providing a method to optimally convert shapes into symbols after the animation is complete so it is not necessary to be thinking about this optimization while you are developing an animation.
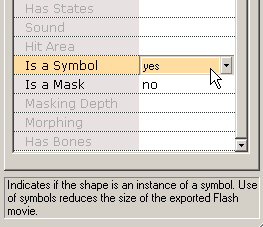 To make a shape into a symbol, select Yes for the Symbols property. This should be done immediately after creating the shape before a copy is made within a frame or a frame is copied. Notice that the points to the shape have a different appearance to indicate that these points are potentially shared with other shapes. The symbol instance is edited like any other shape. If the change affects other instances you will be warned.